

Table of Contents
- Importance of Sealing Pavers
- General Resealing Guidelines
- Factors Affecting Resealing Frequency
- Signs It's Time to Reseal
- Step-by-Step Guide to Resealing Pavers
- Common Mistakes to Avoid
- Benefits of Professional Sealing Services
- Conclusion
Well-maintained pavers can transform your outdoor space, adding beauty and enhancing the value of your home. Regular paver care isn't just about looks—it's also about longevity and durability. One of the most critical maintenance tasks is resealing. But how often does this need to be done to protect your investment? Choosing the proper schedule ensures your pavers remain free from stains, weed invasion, and wear and tear. If you're noticing changes in your pavers' condition, paver resealing could be the upkeep solution you need.
Several key factors influence resealing frequency, including local climate and daily foot traffic. Resealing at the optimal time not only keeps your pavers looking vibrant but also reduces costly repairs down the line. This comprehensive guide explores the best approaches and timelines for maintaining top-condition pavers in your outdoor living areas.
Importance of Sealing Pavers
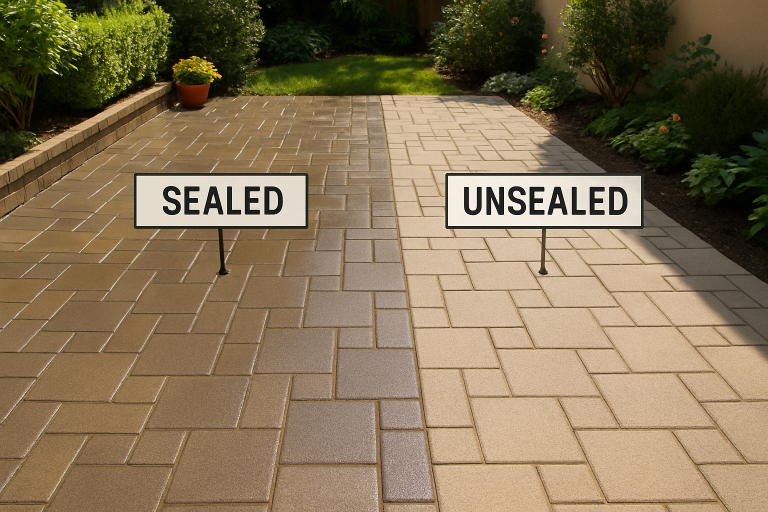
Sealing pavers is a crucial step in maintaining patios, walkways, and driveways. Beyond enhancing curb appeal by deepening the natural color of your stones, a quality sealant acts as a protective barrier. It shields the surface from oil stains, food spills, mold, mildew, and the erosive impact of rain and sun exposure. Sealing also helps to block weed growth in the joints and prevent the fading effects of harsh UV rays, significantly increasing your pavers’ lifespan.
General Resealing Guidelines
A widely accepted guideline is to reseal pavers every 3 to 5 years. However, this schedule may be adjusted based on factors specific to your property. Heavily used driveways or areas exposed to intense sun, for example, might need resealing sooner, whereas sheltered patios can last a bit longer between treatments. It’s wise to monitor your pavers annually so you can adjust your resealing plans as needed.
Regular sealing also protects the pavers’ joint sand, minimizing the risk of shifting and instability in the surface. Properly sealed pavers are easier to clean, resist debris buildup, and can save you from more involved repairs in the long term.
Factors Affecting Resealing Frequency
- Sun Exposure: Pavers in direct, strong sunlight—such as in southern-facing gardens—fade more quickly. UV exposure breaks down the sealant, requiring more frequent reapplication.
- Traffic and Use: Driveways that bear daily car traffic or backyard patios hosting frequent gatherings will show quicker wear of the sealant than walkways that are rarely used. High-traffic areas may require resealing every 2 years, while lower-traffic areas can be extended to 4 years.
- Weather Conditions: Locations experiencing harsh winters, frequent rainfall, or high humidity see faster sealant degradation. The freezing and thawing cycles in colder climates can particularly accelerate the need for resealing.
- Type of Sealant Used: Not all sealers are created equal. Top-quality, professional-grade sealers can provide longer-lasting protection compared to off-the-shelf products, sometimes exceeding the 5-year mark with proper maintenance.
Signs It's Time to Reseal
Apart from watching the calendar, look for visual and physical cues that point to the need for paver resealing. If your pavers appear faded or dull, or you notice water quickly soaking into the surface rather than beading, the protective barrier has likely worn off. Similarly, increased weed growth in the joints, stains that don’t clean easily, or sand loss between pavers all suggest it’s time to reseal.
- Noticeable color fading or a lackluster finish
- Water no longer beads but immediately soaks in
- Weeds emerging between joints
- Tough stains and stubborn debris buildup
- Erosion or loss of joint sand
Step-by-Step Guide to Resealing Pavers
- Clean the Surface: Completely remove dirt, weeds, and surface stains. Power washing is often effective, but make sure to avoid dislodging joint sand.
- Reapply Joint Sand: After the surface is dry, refill gaps with polymeric or joint sand to stabilize the pavers and discourage future weed growth.
- Allow Drying Time: Let the paver surface dry thoroughly—typically 24 to 48 hours—before applying sealer. Applying sealer to a damp surface can trap moisture and cause adhesion issues.
- Apply Sealer Evenly: Use a high-quality sprayer or roller, and follow the manufacturer’s guidelines for the best protection and finish. Ensure even coverage to avoid streaks or missed spots.
Common Mistakes to Avoid
A common mistake is overapplying sealer, resulting in a hazy or cloudy finish that’s difficult to correct without stripping and reapplying. Applying sealer over moisture can trap water underneath, causing hazing, bubbling, or peeling over time. Ignoring weather conditions also affects results—sealing in extreme temperatures or just before rain can disrupt curing and shorten the sealer’s lifespan. Being mindful of these factors helps achieve a smooth, durable, and long-lasting finish.
Benefits of Professional Sealing Services
While DIY paving maintenance can be rewarding, professional sealing services provide a hassle-free experience and consistently deliver high-quality results. Professionals use advanced, commercial-grade sealers and the latest application equipment to guarantee even coverage and proper joint stabilization. Their experience also helps avoid costly mistakes and ensures your warranty remains intact, if applicable.
Conclusion
Keeping your pavers freshly sealed is one of the most effective ways to prolong their life and enhance your property’s outdoor appeal. By assessing their exposure to weather, traffic, and sunlight, as well as regularly monitoring their condition, you can optimize your resealing routine and ensure years of enjoyment from a safe and beautiful surface.

FOLLOW ME ON SOCIAL MEDIA


No comments:
Post a Comment
I love reading and responding to comments but in order to get my reply you must ensure you are NOT a no-reply blogger. If you are, here are some quick steps to change that!
1. Go to the home page of your Blogger account.
2. Select the drop down beside your name on the top right corner and choose Blogger Profile.
3. Select Edit Profile at the top right.
4. Select the Show My Email Address box.
5. Hit Save Profile.